Information related to Wiring Diagram For 3 Way Switch With 2 Lights can be found here, hopefully providing broader insights for you.
Wiring a 3-Way Switch with 2 Lights: A Comprehensive Guide for Electrical DIYers
Electrical wiring can seem intimidating, but with clear guidance and a bit of patience, it’s a task that homeowners can tackle. One common scenario is wiring a 3-way switch with 2 lights, allowing you to control illumination from two different locations.
In this comprehensive guide, we’ll break down the process into easy-to-understand steps, discussing the basics, providing practical tips, and answering frequently asked questions. Whether you’re an experienced DIYer or a novice, this guide will empower you to confidently wire your 3-way switch and illuminate your home with ease.
Understanding 3-Way Switches
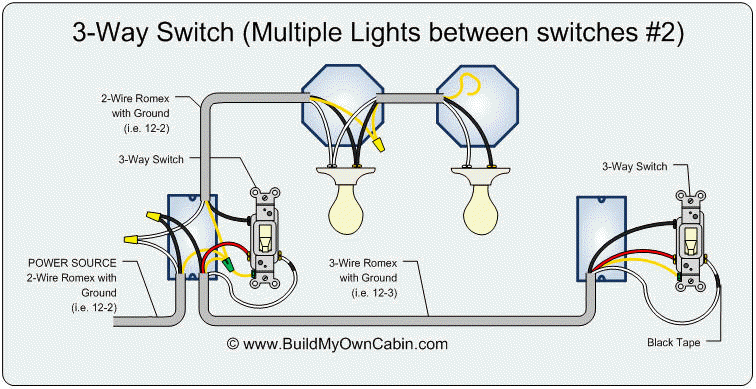
Before delving into wiring, let’s understand the anatomy of a 3-way switch. Unlike standard single-pole switches that have only two terminals, a 3-way switch possesses three terminals:
- **Common Terminal:** Denoted by a darker screw or a black wire, it’s the constant power source.
- **Traveler Terminals:** Typically lighter screws with red or blue wires, they connect the two switch locations.
Wiring the 3-Way Switch with 2 Lights
Now that you’re familiar with the basics, let’s embark on the wiring process:
-
Identify the Circuit: Ensure the circuit is powered off at the electrical panel before commencing.
-
Find the Existing Wires: Locate the existing wires for both lights and the switch locations.
-
Disconnect and Strip the Wires: Carefully disconnect the wires from both switch locations and strip 1/2″ of insulation from their ends.
-
Wire the Common Terminal: Connect the black wire from the power source to the common terminal of one 3-way switch.
-
Wire the Traveler Terminals: Connect one traveler wire (red or blue) from each switch location to the traveler terminals of both 3-way switches.
-
Wire the Lights: Connect the remaining wires from each light to the remaining traveler terminals on each 3-way switch.
-
Cap and Secure the Wires: Use wire nuts to cap and secure all wire connections.
-
Power On and Test: Switch the circuit back on and test the switches to ensure they control the lights as intended.
Tips and Expert Advice
- Use Non-Contact Voltage Tester: Before touching any wires, always verify the circuit is dead using a non-contact voltage tester.
- Label the Wires: Mark the wires to avoid confusion, especially when working with multiple switches and lights.
- Secure the Switches Properly: Ensure the switches are securely mounted to prevent any movement or loosening of connections.
- Refer to Electrical Code: Familiarize yourself with the local electrical codes and adhere to them strictly for safety and compliance.
- Seek Professional Assistance: If you encounter any difficulties or uncertainties, don’t hesitate to consult a licensed electrician.
FAQs on Wiring a 3-Way Switch with 2 Lights
Q: Can I control more than 2 lights with a 3-way switch?
A: Yes, 3-way switches can control multiple lights if they’re wired in a “daisy chain” configuration.
Q: What if my existing switch only has 2 terminals?
A: You’ll need to replace it with a 3-way switch that has three terminals.
Q: How do I wire a 3-way switch with a dimmer?
A: Use a special type of 3-way switch designed for dimmers and follow the manufacturer’s instructions.
Q: Can I use a 4-way switch instead of a 3-way switch?
A: Yes, a 4-way switch can be used in place of a 3-way switch, but it requires additional wiring.
Q: What should I do if the switches don’t control the lights properly?
A: Check the wiring connections, make sure the switches are securely mounted, and verify the circuit is not overloaded.
Conclusion
Wiring a 3-way switch with 2 lights is a rewarding task that enhances the functionality and convenience of your home. By following the detailed steps outlined above, you can confidently tackle this project and enjoy seamless lighting control.
Remember, electrical safety should always be paramount. If you have any doubts or encounter difficulties, don’t hesitate to seek professional guidance. Embrace the satisfaction of DIYing and illuminate your space with the power of knowledge.
Are you interested in learning more about electrical wiring and DIY projects?
Explore our blog for additional articles, tutorials, and expert advice to empower your home improvement journey.

Image: dale-wiring.blogspot.com
Wiring Diagram For 3 Way Switch With 2 Lights has been read on our site. Thank you for your visit. We hope you benefit from Wiring Diagram For 3 Way Switch With 2 Lights.
